
Using
LEGO Robotics in a Project-Based Learning Environment
Mike
Carbonaro, University of Alberta
Marion Rex, University of Alberta
Joan
Chambers, University of Alberta
Abstract
The use of robotics
as an educational tool is growing in popularity. Advances in technology have
resulted in the development of generic robotic construction kits for use in
grade school (K-12) environments. For many teachers, this requires a conceptual
shift away from the idea of learning from technology, often found in traditional
multimedia computer-assisted instruction, toward a viewpoint of learning with
technology in a project-based learning environment. In this learning context,
rather than trying to assess students' performance outcomes using a measurement
instrument, it may be more informative to examine the observable intermediary
states children produce during their problem-solving process. This type of
observational record cannot easily be described in text and still photos, nor
does such a medium allow the richness of expression afforded by digital video
and audio. In this paper, we introduce the benefits of exploring new LEGO robotic
technologies for learning. We describe various LEGO robot construction tasks
undertaken by middle-school children in a project-based learning environment,
highlighting sample products of their work. Finally, we describe how teachers
in a classroom setting can use digital video effectively.
1. Introduction
The use of robotics as an
educational tool is growing in popularity. Advances in technology have resulted
in the development of generic robotic construction kits for use in grade school
(K-12) environments. Recent examples of these new technologies for children
are LEGO® MINDSTORMS™ robot construction kits and LEGO® ROBOLAB™ icon-based
programming software. Such technology allows children to create autonomous
robots that can solve fairly sophisticated tasks such as locating and removing
objects from a defined space. The design of the LEGO robotic products has its
roots in the research of Seymour Papert (1980) and his colleagues at the MIT
Media Laboratory. An important outcome of Paperts research was the development
of a constructionist learning/teaching environment that provides children the
possibility to interact with technology on a number of different levels (concrete
to abstract).
Robotics provides children
with the opportunity to test the results of abstract design concepts through
concrete, hands-on robotic manipulatives (Druin & Hendler, 2000). For many
teachers and educators, this requires a conceptual shift away from the idea
of learning from technology, often found in traditional computer-assisted
instruction, toward a viewpoint of learning with the technology
that is consistent with the "Mindtools" approach to problem-solving
advocated by Jonassen (2000). This Mindtools approach is well suited to the
project-based learning (PBL) environment in which the problem drives the
learning (Hung, 2002). In a PBL environment, students often discover they
need to learn new knowledge and continuously revise existing knowledge before
they can begin solving problems.
In the PBL context, rather
than trying to assess a students performance outcomes using a measurement
instrument, it may be more informative to examine the observable intermediary
states children produce during their problem-solving process. This type of
observational record cannot easily be described in text and still photos,
nor does such a medium allow the richness of expression afforded by digital
video and audio. In this paper, we introduce the benefits of exploring new
technologies for learning in the form of LEGO robotics. Students use the
LEGO (Mindstorms for Schools) Team Challenge Kit #9790 (LEGO, 1999a) in conjunction
with a programming environment called ROBOLAB. We describe various LEGO robot
construction tasks undertaken by middle-school children. We then demonstrate
the end products of their workautonomous robots solving problems. Finally,
we demonstrate how teachers and students in a classroom setting can use digital
video as a tool for assessment purposes and as an opportunity to share their
ideas within a broader based learning community.
2. Project-based Learning (PBL)
Designing a robot to do
even a simple task can place extensive demands on students' creativity and
problem-solving ability (Druin & Hendler, 2000). Building and programming
autonomous robots is an ideal context in which to situate a PBL experience.
In the PBL environment, students work collaboratively to understand the problem
as they construct viable solutions (Lui & Hsiao, 2002). Successful PBL
questions lead to projects that are related to authentic situations, which
have pragmatic meaning for students (Brown, Collins, & Duguid, 1989). A
guiding question or problem usually sets the stage and the project context
allows for a multitude of design paths. Students can collaborate over an extended
period of time during a problem solving activity. The result of this collaboration
is the construction of an artifact that can be presented to a wider classroom
audience. The production of an artifact, that is readily sharable with a larger
community of learners, encourages students to make their ideas explicit. According
to Penner (2001), having students make their ideas explicit to larger communities
of learners allows students to experience science concepts in a meaningful,
personalized context.
In general, PBL (see Figure 1) is characterized by five processes: (a) engagement,
(b) exploration, (c) investigation, (d) creation, and (e) sharing. Underlying
these five processes is an iterative analytical evaluation of the students' problem-solving
approaches and solutions.
 An
external link to sharing. http://www.qesnrecit.qc.ca/workshops/pbl/#2
An
external link to sharing. http://www.qesnrecit.qc.ca/workshops/pbl/#2
| Project-Based
Learning |
| Engage |
Explore |
Investigate |
Create |
Share |
| EVALUATION |
Figure 1. Modified
diagram taken from
An
external link to www.qesnrecit.qc.ca/workshops/pbl/assess.htm
The project serves as the
central focus that drives the problem-solving process forward. For example,
one usually begins with a problem, question, or task which requires a sophisticated
degree of problem solving.
- Problem context: Robot
construction
- Primary resources:
LEGO MINDSTORMS robot construction kit, ROBOLAB programming environment,
and a personal computer.
- Overall guiding problem:
Design and build an autonomous robot that is capable of removing objects
from specified area.
The overall project question
should be made relevant and linked to meaningful real life experiences and
engage the student in a complex activity. Furthermore, the complexity of
the problem dictates the necessity for students to cooperate and collaborate,
where each participant is afforded the opportunity to play a role in a team-like
environment. For example, within the context of robotics, we might have various
specialties, such as, designer, builder, programmer, and documenter.
From a teaching perspective,
a number of aspects are important for assessment and evaluation of students'
work in a PBL context: (a) students should understand the process of how
they got to where they are and where they want to go; i.e., the problem-solving
choices they make; (b) students should be able think about the outcomes of
their work; (this can done through combination of a written logbook, verbal
explanation, or video demonstrations); and, (c) the project guidelines must
include some levels of criteria that students can work toward at various
points during the PBL process (see the www.qesnrecit.qc.ca/workshops/pbl/assess.htm
for examples of PBL rubrics that can be used).
An
external link to examples of PBL rubics. http://http://www.qesnrecit.qc.ca/workshops/pbl/assess.htm
3. Engaging the Learners as Robot
Designers in a PBL Environment
The objective
was to conduct a pilot study of childrens problem-solving approaches
to building and programming LEGO robots using new curriculum materials
in a PBL environment. Two different middle schools were involved
in the pilot study. Students at each school were sorted into collaborative
teams of two or three. The students were asked to record their
problem-solving approaches in a reflective logbook during the building
and programming of their groups robot. Video was used extensively
to record various stages of robot construction. The video also
included student explanations of their project development steps
and problem-solving processes.
The PBL environment, resources,
and overall guiding project question was introduced to the students:
Using the LEGO MINDSTORMS
kit and ROBOLAB programming language: How would you design and build
an autonomous robot that is capable of removing 5 soda-pop cans from
a specified area that is one meter in diameter?
The PBL resources and overall
question are provided as part of the LEGO ROBOLAB Team Challenge kit (LEGO,
1999a; LEGO, 1999d) and associated teacher resources (LEGO, 1999b; LEGO,
1999c); however, these resources were modified to fit the context of the
school and classroom environment in which they were used. Given the complexity
and open-ended nature of the task, a semi-structured instructional PBL environment
was necessary to complete the project within a given time specification (total
time 25 hours). Therefore, the PBL environment was configured into three
incremental sections: (1) building an Acrobot as a simple introduction
to the kit and programming language, (2) exploring the advantages and disadvantages
of various chassis designs for speed, power, durability, and maneuverability,
and (3) applying skills learned in both chassis design and programming to
solve as many levels of the CanDo challenge as possible (there are four levels).
Each section allowed the students to gain the necessary knowledge required
for the completion of the subsequent section.
4. Acrobot
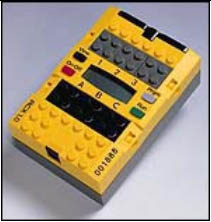
The first section involved
the students becoming familiar with various pieces of LEGO robotic kits. For
example, students needed to become familiar with the small LEGO RCX unit, sometimes
referred to as the LEGO Brick (see Figure 2). This brick contains the CPU and
input/output connections to control the robot actions. The ROBOLAB (see Figure
2) programming language the students use is a visual icon-based environment
(Portsmore, 1999). Programs are transferred from the desktop to the RCX via
infrared link.
(a)
(b)
Figure
2. (a) The RCX and (b) example
ROBOLAB program code.
To facilitate student familiarization
with the robotic kits and programming language, the students were directed
to build the Acrobot robot (see Figure 3). The building of this specific
robot allowed for a quick and simple introduction to topic areas, such as
team configuration, programming, specialized LEGO sensors (e.g., touch and
light), and construction practices.

Figure 3. LEGO Acrobot.
Once the Acrobot was built
according to the instructions provided, students were asked to identify common
weak points in the robots construction and what methods they would use to
strengthen it. The following excerpts from student log books are typical
examples of their understanding and problem-solving process:
The wheel on the front
looks like it would fall off on impact when crashing into solid objects
because it looks like a weak attachment. I added an extra wheel in the
front and built under the robot to make a piece of LEGO go across part
of the two motors and attached the end to the pieces next to it giving
it more strength.
Grade 7 Student
This structure does have
weak points. One of them is the back wheels. They will fall off easily
because there is no type of bracing to keep the wheels on. I would brace
the back wheels to the main structure at the bottom and brace the front
to the RCX, using elbow pieces. Then Id strengthen the back by adding
a few other pieces to connect the back together.
Grade 7 Student
I think this structure
has common weak points because the blocks cant always hold. If you build
a robot and drive it into the wall, chances are the robot will break. You
will need to make it stronger. I added braces to the wheels on the bottom
making the wheels fall apart less and I added braces to hold the 2x2 connectors
on. When we made the Acrobot, we had to make sure it flipped in both directions.
The Acrobots center of gravity changed when we added weight to the back
end. We had to add weight to the front end to move the centre of gravity
back to the center of the robot so it would flip again.
Grade 7 Student
The next two sections describe
the major elements of the students design and development work. Video is
used to record the students explanations and help further their understanding
of mechanics and the tasks their robots are performing.
5. Chassis Designs
Through preceding trials,
we found that even students from the "LEGO generation" had difficulty
building structurally sound chassis. Students often do not have a solid understanding
of how they might utilize gear reduction and other mechanical advantages to
build a robot for speed, power, durability, or maneuverability. Consequently,
the second step in the PBL environment was orchestrated to give the students
the opportunity to construct, evaluate, and compare various chassis designs.
Student groups were assigned the task of building, testing and evaluating specific
chassis designs from the Subassembly Constructopedia (LEGO, 1999d). The designs
in the Subassembly Constructopedia are incomplete, requiring the students to
use their own ingenuity and creativity in completing the chassis in the form
of a working robotic vehicle. Additionally, as part of the PBL environment,
the students were asked to demonstrate and talk about their chassis designs
with their classmates. The sharing of design features, advantages, and disadvantages
with classmates proved valuable for the students, particularly when it came
time to design their final team challenge robot. The following are examples
of student chassis evaluations for three different chassis designs: (a) Backup
and Turn Chassis, (b) Hill Climber Chassis, and (c) Two-Wheeler Chassis.
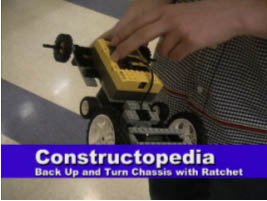
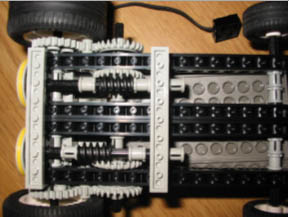
5.1 Back-up and
Turn Chassis
The differential incorporated into this particular single-motor chassis design
proved an interesting challenge for students. However, as evidenced in the video
clip (see Figure 4), the Grade 9 student in the group was able to explain the
basic workings of the mechanism, forces, and gears as well as demonstrate an
understanding of the weaknesses of their design. The following written explanation,
from a Grade 8 student, demonstrates a fairly sophisticated understanding of
the gears and forces at work within their chassis design:
Our robot has a force advantage.
The driving gear is made to form a gear train that changes the direction
of the force. The differential in our chassis allows both back wheels to
move independently of one another. Our robot can turn even though it has
only one motor. To do this we back it up. The left wheel will stay still
and gets locked in place with a ratchet so it will always turn to the left.
Then we can move it forward in a different direction.
Grade 8 Student

(a)
(b)
Figure 4. The Back
Up and Turn Chassis. (a) Differential
on underside of Back-up & Turn chassis. (b) A video clip: explanation
of the ratchet and driving mechanism.
 Video
clip (QuickTime, ~18 MB): explanation of the ratchet and driving mechanism.
Video
clip (QuickTime, ~18 MB): explanation of the ratchet and driving mechanism.
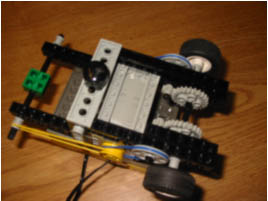
5.2 Hill Climber
Chassis
The students assigned the Hill Climber Chassis were faced with a definite construction
challenge. This particular chassis design utilizes a complex gear-train system
in order to greatly increase the power of the robot. The following written reflection
and verbal explanation (see Figure 5), both by the same Grade 8 student, demonstrate
an understanding of the gear/force relationships at work within this particular
chassis design.
Our robot has the greatest
force advantage. A small pulley wheel, which is attached to the motor,
has an elastic band around it attached to another bigger pulley wheel giving
it a force advantage. Attached to the axle of the larger pulley wheel is
a worm gear, which turns a gear wheelgiving it a huge force advantage.
On the other end of the axle of the gear wheel is another gear wheel (confused
yet?) It is part of the gear train that eventually turns the wheels.
Grade 8 Student
(a)
(b)
Figure 5. Hill Climber
Chassis. (a) Undercarriage of chassis. (b) Pulley system.
Video
clip (QuickTime, ~7 MB): Gear reduction made our robot very strong.
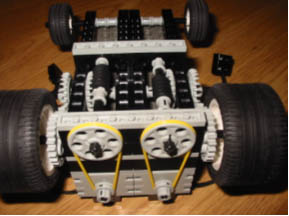
5.3 2-Wheeler Chassis
In this example of a student evaluation of a specific chassis design, the physical
movement of the robot and turning of the gear-wheel mechanisms helped to
clarify the students understanding of the inherent concepts. In their verbal
explanation (see Figure 6), these grade 7 and 8 students use actions and
visual movement to aid in their explanation and understanding. The students written
reflection is not as conceptually rich as is their explanation on the video.
The advantages of the 2-Wheeler
chassis are many. The slower movement of the robot enables it to travel
uphill, without falling down. The robot has one motor per wheel. The smooth
surface of the skid at the bottom of the robot contributes to smooth and
short turning. The device makes very small and short turns, which is an
important factor in making sure the robot does not crash into anything.
The robot has lots of durability and power. With 2 motors the device is
open to more abilities. The disadvantages of the 2-Wheeler chassis are
few. The wheels are driven by a chain (elastic band), which increases friction
and slippage and causes the robot to move more slowly. Being made from
LEGO, the robot can also break easily. This gets very irritating when you
are trying to make the 2-Wheeler chassis more complex. The last disadvantage
is it requires lots of small pieces.
Grade 7 & 8 Students

(a)
(b)
Figure 6. (a) 2-Wheeler
Chassis. (b) Undercarriage of 2-Wheeler Chassis.
Video
clip (QuickTime, ~7 MB): 2-Wheeler Chassis in action.
6. CanDo Team Challenge
At this stage in the PBL
environment, students were required to employ previously gained knowledge to
solve a fairly sophisticated task. The CanDo challenge requires teams
of two to three studentsbuilders, programmers, parts specialists, communicators/journal
keeperto design, build, and program a robot to remove randomly-placed, weighted
soda-pop cans from within a circle that is about one meter in diameter.
The student problem-solving
approach for the CanDo challenge is highly open-ended; thus, there is a need
to provide some degree of structure. Teams were color coded for organizational
purposes. The following challenge levels were to be attempted by each team:
Level 1: The robot starts
inside the circle and removes the cans from the circle.
Level 2: The robot starts
inside a house adjacent to the circle. The robot is pointed facing the
circle. The robot enters the circle and removes the cans.
Level 3: The robot starts
inside a house adjacent to the circle. The robot is pointed facing away
from the circle. The robot enters the circle and removes the cans.
Level 4: The robot starts
as in Level 3, but must play a sound each time a can is removed from the
circle.
The levels were organized
hierarchically to reflect an increasing level of difficulty. Video was used
to record the individual teams accomplishments at various levels. Team members
were asked by the teacher to explain the design features of their robots
and why they made certain choices during their design process. Video segments
depicting examples of CanDo challenge work are located on our Web site.
An
external link to web site. http://www.quasar.ualberta.ca/legorobots/challenges/teamchallenge/schoolM/index.htm
The use of video in a PBL
environment provides a rich representational paradigm for students to articulate
their problem-solving processes and demonstrate their final solutions. In
this sense, the video provides an additional source of information for both
students and teachers to evaluate problem solving. In the context of assessment
and evaluation in this PBL environment, other information sources include
still photos, logbooks, and programming code. The additional information
provides teachers with the opportunity to evaluate students abilities from
a variety of perspectives. For example, a student who struggles academically,
performed exceptionally well throughout the robot construction and programming
task. The video clips in Figure 7 show this student explaining his problem-solving
approach to the Level 4 challenge.
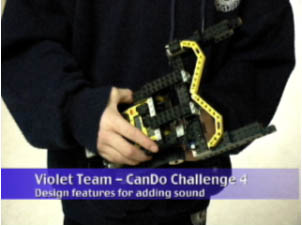
Figure
7. Explanation of the design features for adding sound to solve the
Level 4 challenge.
Video
clip (QuickTime, ~10 MB): Explanation of the design features for adding sound
to solve the Level 4 challenge.
The student's problem-solving
ability was most evident when he worked with concrete objects (motors, gears,
structural components) used in the construction of the actual robot. Interestingly,
the student appeared able to bridge his strength in one area (working with
concrete objects) to a related yet fairly abstract area, computer programming.
The bridging process was aided by the graphical nature of the programming
environment. Figure 8 shows an example of program code written by the student
to solve the Level 2 challenge.

Figure
8. Program code for the Level 2 challenge.
 Full
size image in pdf.
Full
size image in pdf.
Notice that the icon-based
programming code (ROBOLAB) uses a representational approach that often provides
one-to-one mapping between the virtual screen object (e.g., motor) and the
actual concrete object (e.g., LEGO motor). Such a programming environment
appears to enhance the ability of students to understand the relationships
between concrete and abstract concepts. Compare the program code in Figure
8 with the program code in Figure 9, written by the same student, to solve
the more difficult Level 3 challenge.
Figure
9. Program code for the Level 3 challenge.
Full
size image in pdf.
The code shown in Figure
9 reflects a higher level of problem solving that one would expect to see
as the difficulty of task increases. In this case, the pictorial representation
of code shows the nonlinear nature of the program's execution. The programming
solution generated by the student reflects the complexity of the problem.
Writing a program requires defining the problem, designing an algorithm,
coding a possible solution, and debugging the program. At the same time,
the student must keep in mind the functioning physical structure of the robot.
These skills are often associated with logical reasoning and complex thinking
skills (Jonassen, 1996). In Figure 10 we can observe how the student's programmed
solution functioned for the Level 3 challenge.
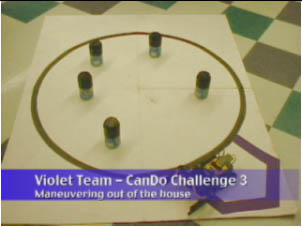
Figure
10. The Violet team Level 3 challenge.
Video
clip (QuickTime, ~12 MB): The Violet team Level 3 challenge.
Teams also kept reflective
logs that clearly showed their own unique understanding of the challenges
and successes they faced in solving each level of the CanDo task.
Another example depicting
how students were able to use video effectively to articulate their problem-solving
process was clearly exhibited by the teams robot design in Figure 11. The
team designed a robot with a removable plow, so their program could be downloaded
easily (i.e., update robot control).
An
external link to reflective logs. http://www.quasar.ualberta.ca/legorobots/challenges/teamchallenge/schoolM/violet.htm
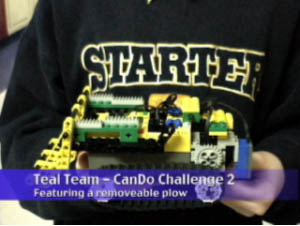
Figure
11. Rationale for designing a removable plow.
Video
clip (QuickTime, ~11 MB): Rationale for designing a removable plow.
In this case, the students concrete
problem-solving skills were excellent, as was their ability to demonstrate
their knowledge. On the other hand, their written explanations were not as
rich.
In summary, the CanDo team
challenge was shown to be an effective learning exercise in the context of
the PBL environment. The multilevel organization of the challenge provided
the necessary task structure while still allowing the students an opportunity
to pursue an open-ended individualized approach to problem solving. Students
were encouraged to work at their level of ability from the basic understanding
in Levels 1 and 2 of the challenge to more complex problem solving required
for Levels 3 and 4. All students in the class were challenged at their level
of understanding.
7. Final Analysis
The often quoted phrase
'learning by doing is never more appropriate than in a PBL environment designed
to teach students how to build autonomous robots. Such a learning context is
highly student-centered as opposed to teacher-centered. Designing a robot to
do even a simple task can place extensive demands on students individual creativity
and problem-solving abilities. At the same time, the learning context allows
students to work in a constructionist, collaborative learning environment that
promotes the sharing of ideas. Furthermore, Kafai & Resnick (1996) suggest
that this type of constructionist learning environment is well suited to learning
in a digital world because it requires the learner to produce artifacts
(in this case, a robot) that can be shared with a larger audience.
Although students could
express their thinking through a variety of sources (audio/video, written
logs, physical construction, and computer programming), it was the use of
video, as part of the PBL assessment and evaluation process, that appeared
to be the most valuable element for both the teacher and students. For students,
it provided a feedback mechanism that helped them assess their progress.
The use of video also encouraged them to further solidify their learning
because of the necessity of having to publicly explain various elements of
their problem-solving process.
From the teachers perspective,
the video provides a valuable additional source of information for assessment
purposes. The video recordings nicely supplement the reflective logs by allowing
the students to further elaborate on their reasoning for pursuing a specific
course of action, especially for those students whose verbal skills are stronger
than their written skills. This was shown in the sections on chassis construction
and during various levels of the CanDo challenge. Furthermore, video clips
provide an artifact that can be shared with a larger audience (other classes,
parents, community stakeholders).
The current project only
begins to explore the potential of how robotics and video can be effectively
used in a PBL environment. The design of similar instructional projects calls
for the development of creative teaching techniques in a student-centered
learning context.
8. References
Brown, J. S., Collins, A., & Duguid,
P. (1989). Situated cognition and the culture of learning. Educational
Researcher, 18(1), 32-42.
Druin, A., & Hendler, J.
(2000). Robots for kids: Exploring new technologies for learning.
San Diego, CA: Academic Press.
Hung, D. (2002). Situated
cognition and problem-based learning: Implications for learning and instruction
with technology. Journal of Interactive Learning Research, (13(4),
393-414
Jonassen, D. H. (1996).
Computers in the classroom: Mindtools for critical thinking. Englewood Cliffs,
NJ: Prentice Hall.
Jonassen, D. H. (2000).
Computers as Mindtools for schools: engaging critical thinking (2nd ed.).
Upper Saddle River, NJ: Prentice Hall.
Kafai, Y., & Resnick, M.
(Eds.). (1996). Constructionism in practice: Designing, thinking and learning
in a digital world. Mahwah, NJ: Erlbaum.
LEGO (1999a). LEGO
MINDSTORMS™ set for Schools # 9790. Billund, Denmark: The LEGO
Group.
LEGO (1999b). Introductory
Activities for LEGO DACTA Set # 9790. Billund, Denmark: The LEGO Group.
LEGO (1999c). LEGO DACTA™ Robotics
System Teacher Notes and Copymasters for LEGO DACTA™ set #9790.
Billund, Denmark: The LEGO Group.
LEGO (1999d). Subassembly
Constructopedia. In LEGO Group (1999), LEGO MINDSTORMS™ set for
Schools # 9790. Billund, Denmark: The LEGO Group.
Lui, M., & Hsiao, Y. (2002).
Middle school students as multimedia designers: A project-based learning
approach. Journal of Interactive Learning Research, 13(4), 311-337
Papert, S. (1980). Mindstorms:
Children, computers and powerful ideas. New York, NY: Basic Books
Penner, D. E. (2001). Cognition,
computers, and synthetic science: Building knowledge and meaning through
modeling. In W. G. Secada, (Ed.) Review of Research in Education.
(pp. 135). Washington, DC: American Educational Research Association.
Portsmore, M. (1999). RoboLab:
Intuitive robotic programming software to support lifelong learning, Learning
Technology Review, Spring/Summer, 26-39.
********** End of Document
**********
© 2004 Wake Forest
University (from Volume 6, Number 1, of The Interactive Multimedia Electronic
Journal of Computer-Enhanced Learning).